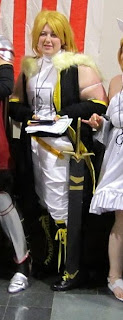
After cosplaying for almost 10 years I was a little shocked when I realized I had yet to make a sword. I had seen about a dozen tutorials on making them from insulation foam, PVC and foam/ fabric, plywood, and papier-mâché. So when my group decided on Vocaloid’s Synchronicity for our Anime Boston 2011 Masquerade entry I knew I needed the sword. If you are unfamiliar with Len’s sword it’s a traditional looking medieval long sword. How to make it was something I questioned for a bit. I needed it to be light weight and slender. I didn’t have the patience to carve and sand the foam down that much, and was also afraid it would break easier. I needed it to survive a 1 hour car ride and 20min on a crowded train, not to mention the convention its self. When wondering around my local Dollar Tree store I came across foam core board. I had used it on school projects before, and then I realized it would be perfect! I got 2 sheets, but I ended up only needing one. Then on my way out I found a bamboo and reed decorative bundle. The bamboo stick was the perfect length for the sword. I quickly got those items and headed home to start!

First you may have to gather a few other supplies: A pencil (with/ & eraser), a yard stick or ruler and long straight edge, masking tape, and scissors or razor. I only had scissors- you will not be cutting with the scissors normally- this will pinch the foam core. You will open the scissors all the way and score with the blade.
Now that you have all your stuff you can start! First decide how wide you want the blade. I went with 2inches. Now measure out 2 inches from the edge and draw a line, then 2 inches from your drawn line and make another line. Cut it out. Now for the length- Your dowel should be the about the full length of the sword. If its to long cut it down id it’s a little short its okay, a little extra length added with the foam core will be okay. The length of your foam core strips will be determined by laying your dowel down and marking off what you need for the handle. I just eye balled it. Sorry no math formula for you.
Now draw a line down the middle of each strip you have just cut out, then score lightly- DO NOT CUT THREW! You want the foam core to bend not split apart.
Now to make the point of the blade. Its kite shaped and needs to be 2 inches wide and then taper down to a point. One end will be shorter then the other. Once your kite shape is cut out trace the short end on to the strip that you already have cut and scored. Cut it out.

Now we can start assembling! Tape the tip/ point onto the strip- already looking like a sword- do this for both pieces. Now sandwich the bamboo/ wooden dowel between the 2 strips. The end of the dowel should be just into the tip section. You may need to cut some small pieces of foam core to act as shims to steady the dowel. Start taping the bugger together along the sides, completely wrapping it at the top, middle, and just above the point section. The point section should be wrapped more, and tighter. There will be and angel to the point section- that’s good.

The handle will get a little tricky- and will differ depending on your design. Len’s sword its fairly simple, and keeps with a traditional look. It does have a V design were the hilt, and blade meet. So I cut a square and notched it out to fit around the dowel for both sides.

To make the handle I measured the remaining length of the exposed dowel and decided to add another inch, so cut a 2’’x 5’’ strip of foam core. Then with a straight edge score the strip every quarter inch or so, you will want this to curve around the handle. Tape it on.
Now to expand the hilt. Len’s it just straight with a little down turn on the ends. So I cut strips and scored the ends to bend down.
So that’s the sword! Yay!!!! I needed the sheath too, so if you don’t just skip ahead to finishing.
You made it this far so the sheath will be easy! Don’t worry it really is. Just a box to slide your sword into. So unless you made a 5’’ wide blade you should have half the sheet of foam core left. You are going to be cutting more strips like you did for the start of the sword. Add another inch to the width. So my sword was 2’’ so my sheath is 3’’.
To determine the width of the sides was a little tricky for me. I wanted the sides to curve to I took a strip and scored it to curve. It was to small, so because of time I used straight sides. Eyeball how thick your sword is and cut a strip to cover. Use that same thickness to cut two smaller strips to cover the point section too! I cut a notch for V to sit in.


Alright now for the most time consuming part- and we need some more supplies. You will need Newspapers, flower and water (papier-mâché), a mixing bowl, Elmer’s Glue, a sponge brush - or wide paint brush will do, and Gesso or another primer. Also decide on your paint colors, but you won’t need the paint for a bit.
Get ready to papier-mâché! You will need lots news paper strips, so get tearing! My recipe for Papier-mâché is 1 part flower to 2 parts water, add a dash of salt to stop molding, and a sprinkle of cinnamon to make it smell better (optional). Mix it all together till the flower is well blended. It will be a bit lumpy- its okay. Dip the strip of newspaper into the mix and run it between two fingers to get off excess. Cover your sword and sheath in newspaper, several layers. Build up areas you want to add a little more thickness or shape to. I rounded the top of the hilt/handle, and thickened up and smoothed were the hilt meets the blade.
I have about 4 layers of papier-mâché coating this sword. After it is completely dry, COMPLETELY DRY! Seal it with Elmer’s Glue. I have about 7 layers of glue on this bad boy. The glue will seal it and strengthen it, while keeping it light weight.
Once the glue is dry you will need 1 or 2 coats of Gesso, or another primer. This will prepare the surface for your amazing paint job.
So now you get to have fun and paint. I used craft acrylics in metallic shades of gold and silver, as well as a matte black.
TA-DA!
Alright so most people may not have all this stuff laying around like me, but I still feel that this is a pretty thrifty way to make a sword. And there is a strong chance that most people do have about 50% of this already in their homes. That is the best money saving tip anyone can give- See what you already have that you can use/reuse. Oh, and always take advantage of your local Dollar store and thrift stores!!!
I only had one week to make this, while working a full time job- so it was rushed. I should have taken more time to smooth out the newspaper so it wouldn't have been so bumpy/ wrinkled. If you take your time it will look good!


